Sunday, October 12, 2014

Previewing a new Material Presets Manager for mGo! - The Materialiser


It's been too long between updates. Things have been really busy lately and I've needed some rest, but I'm at the point where I'm ready to jump into it again. Looking over the blog I realize it's deviated a bit from the original intention- which was talking about materials and shading networks and building up a resource of techniques- and has instead become a kind of dev blog for the couple of python projects I am involved with. I'm not sure what to do about that just yet.

Today though, I will atleast try to merge those two things by previewing a new feature to mGo!, which I've dubbed 'The Materialiser'. This new functionality will allow you to save and load material presets from inside Mari, and of course is designed to work with Antonio's production based OpenGl shaders. When importing a preset, the script will read the shader type and from there a new shader will be created and every attribute set. In this way you can quickly get up and running with materials in Mari by having quick and easy access to these presets. When saving, you'll be able to sort your custom materials within categories, based on shader type or whatever you wish, and we'll include a bunch of presets with the release.

A feature which could potentially really help Mari artists is an RGB values to New Channel feature, which I've been trialing the past couple of days. This would take any attributes in the material preset which were represented as RGB values, eg- the specular colour of a gold material or the gloss value for a matt plastic, and recreate those values inside new channels by adding a constant colour layer inside of them. From there, the new layer would serve as a reference or guide - you'd have a base colour or greyscale value to work from as you built up textural variety around those values. It seems like this would be quite useful.

While I'm working on this stuff, Antonio is putting the finishing touches on a new system which will allow blended shader and falloff shader support in mGo! We'll transfer this system over to the Materialiser soon, so you'll be able to easily load up a 'carpaint with decals' blended shader preset if you wanted- and output the whole network directly to Maya once textured. Lots of interesting potential there.

Tuesday, April 8, 2014

Mari Custom Shaders Project Update

mGo! Exporter

We've recieved a lot of great feedback from Mari users about the Custom Shaders project. If you haven't caught up on the latest videos, Antonio has posted to Vimeo some demonstrations here, here, and here. Needless to say, we'll be pushing things further with new ideas- we're passionate about the project and are looking forward to seeing things evolve.

For now, I'd just like to go through a couple current features of the exporter, which haven't been covered in the videos. First to mention is that the exporter supports shader connections to Maya linked to multiple objects. So for example- if you have a head object, and then some eyes as a separate object in Mari, you can export textures and shader attributes for the head, and then the eyes, and update those shaders and textures specific to each of those objects whenever you want in a back and forth manner.

Second (and this is obviously a small feature) is the texture filter options menu in the Mari exporter UI. This lets you select amongst a small set of options related to the filter settings in Maya's filenode. The default setting 'Quadratic' blurs textures heavily and it's a pet peeve of mine to always go into that setting and turn filtering to 'Off'. 'Quadratic' and 'Off' plus another option, 'Animation' (Quadratic filtering with a reduced filter of .1 from the default 1) are the three available choices for now.

Tuesday, February 11, 2014

Preview of 'Mari Go!' - And some Good News about LookDev in Mari


The Mari to Maya bridge is coming along and recently there have been some exciting developments which have impacted the project in a positive way, allowing it to be a much more useful tool than I'd originally planned. It's now being integrated into a larger project with a bigger vision- the central idea or tool being the development of some fantastic new custom shaders for Mari. These shaders are being designed (by Antonio NetoMiguel A Santiago Jr and Nicholas Breslow) as accurate representations of existing architectural/monolithic shaders used in various 3d renderers, such as Arnold, Vray and Mental Ray, and will allow artists working in Mari to get a much better sense of how their texture maps are going to look in render.


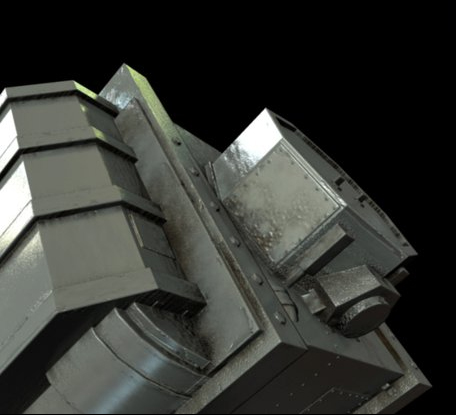
mia_material replicated in Mari (by Nicholas Breslow)


Once the user is happy with how things are looking inside Mari, all textures and shader parameters set within the custom shader will translate 1:1 over to Maya/Softimage, enabling a very quick and simple way to get texture assets out of Mari and into your 3d package, ready for a test render.

Check out the 'Mari Custom Shaders' project on the Paintmore forum, here.

Sunday, December 29, 2013

Creating a 'Gummi' type Thickness Shader (Part 1)

POST UPDATED 31/12/2013 - INCLUDES SETTINGS FOR MENTAL RAY MIA_MATERIAL
Thickness pass (values inverted from render) - Mental Ray


Some time ago I figured out it's possible to make a serviceable 'thickness' or 'gummi' type compositing/utility shader in Vray using the Vray Mtl and it's 'Fog' parameter. At my current workplace we've used in the past a 3rd party shader from Binary Alchemy (the RayLength shader I believe), in order to compliment subsurface scattering at the compositing stage via a thickness pass. This was explained to me by my boss at the time as a dirty trick, which nevertheless had the desired effect of making our CG food look more 'foodlike' and appetising. It's a strange but potentially useful technique, which I'll cover in a later post. For now let's just focus on making the shader. The basic idea is also translatable to a MR mia_material version, using the 'Max Distance' instead of the Vray 'Fog' parameters.

Basically, a thickness shader is one which is able to approximate the interior thickness of an object. A thickness pass would describe in greyscale values the relative thickness of something, ie- whiter pixels representing thicker areas and darker pixels thinner areas. As you can see in the video above, the dragon's tail, tip of the tongue, horns etc, are all darker in colour while the belly, legs and head are the thickest, lightest areas. When setting up the shader, we will need to invert these values however, and then re-invert back in our compositing package later on.

Setting up the shader/pass...


Saturday, December 28, 2013

Create your own XSI styled Maya Viewport Render Tool


One Softimage feature which I've felt was sorely lacking in Maya (apart from ICE of course) is the awesome interactive viewport renderer. This thing is super functional- you can quickly via shortcut make a little region render in full persp view to see how one little aspect of your scene is looking, or drag a rectangle over everything for a full render without needing to open up the render view and close it back down again. The benefit is that it doesn't interrupt you by taking you out of your normal working view. Going back to Maya and dealing with the render view panel feels really unintegrated and clumsy by comparison.

So how happy was I when I saw that someone over at Therenderblog has developed a Softimage style viewport render tool for Maya, which theoretically will work with any renderer of your choice and will help educate you about scripting Python tools in Maya to boot?

Pretty happy.


Saturday, December 14, 2013

Thinking 'bout Mari


Mariya/Gomaya design concept.
There has to be a better name for this thing

This is currently just concepting an idea. I've been inspired recently by Dave Girard's Mari Me script for Maya- I thought it might be fun to see how Python works in Mari and started wondering about a Texture Robot type script which works across Mari and Maya, sending out the locations of flattened channels to Maya to be hooked into shading networks, a la Texture Robot.

It looks a lot like Texture Robot right now. The main design difference is in linking the various shader inputs to existing Mari channels, rather than filenames in a directory. Again, you'd select the shader type appropriate to the renderer you're using. UDIM support will need to be a feature.

Early days.


update:

Tuesday, June 18, 2013

Texture Robot - Version 1.2.0

TR - 1200


I wanted to get a new version of TR out before going overseas, so here it is. The main new feature is a store current config button (top left), which will save you from having to re set things up the way you like them everytime the script is run. The configuration file stores all the suffixes, file extensions, checkbox options and currently selected shader type.

Another new addition is Ptex support (currently only available with mia_mat and Blinn in TR as I ran out of time for Vray. Arnold doesn't support Ptex in Maya yet). Ptex is not a file format I'm very familiar with, but I thought I should address it as you can't load in ptextures with normal file nodes while using MR or Vray, you need to use special nodes specific to each renderer. Ptex does work with normal file nodes in Viewport 2.0 however, so the Blinn shader option in TR goes that route.

The icing on the cake is a somewhat nice-a-fied UI, with a new info bar at the top of the window for displaying messages.

Oh, and emissive textures now actually go where they're supposed to.  (golf clap...)

Creative Crash has it.
Changelog

update: version 1.3 available. Fixes bugs, adds stuff
http://www.creativecrash.com/maya/script/texture-robot

Wednesday, June 12, 2013

Texture Robot updated to Version 1.1.0


Just a quick note to say that the Texture Robot script for Maya has moved up the chain to version 1.1.0. I'm getting closer to implementing all of the features I'd originally planned for it, including support for various renderers (Arnold, Vray) via the aiStandard material and the Vray Mtl. There's also support for Maya's blinn, which is useful in a viewport 2.0 viewport environment as you're able to display more types of texture map (including bump and specular) than the other materials. I've been using it a lot lately for quick previews and it works great. Of course, it's nothing compared to what you can do with the new Dx11 shader, which I'll hopefully get around to doing something about for games people in a later version.

There's also been a few added texture slots- Transparency, Cutout Opacity, and Emissive (self illumination/incandescence). I think this covers the most widely used types of texture map that people regularly use. There's SSS to deal with, but again, that's for the future, hopefully not to distant.

The last thing I want to mention is the added 'tooltip' descriptions as you hover over parts of the UI. Most of them just describe the thing itself (browse Texture Directory icon for instance), but if you hover over the texture slot labels on the left hand side, you will get a little message showing you where the texture slot connects into the various shader's parameters. For eg, hovering over the 'Spec Gloss' label will bring up the following:


TR- now with tooltips. Goody


So this is just a way to understand the different terminology across shaders, how the parameters relate to each other and hopefully it can help to clear up any confusion about where each texture slot is going. I used pretty standard names for each slot (specular instead of reflection, as I don't think anybody refers to a specular map as a reflection map, but I could be dead wrong) but just in case, these tooltips are there.

Next feature I'll be working on is a button to save out A custom setup within TR. That means, if you don't like the suffix 'd' for diffuse, but prefer 'c' for colour or something else, you can save your custom suffixes and next time you run the script, it will load your preferences. It should also save out the shader type, file extensions and the other various options. That would be pretty handy I think.

You can get the latest version of Texture Robot here.

Full Changelog.


Friday, May 31, 2013

Texture Robot - Home

DOWNLOAD LINK (ver 1.3.0 - July 27th, 2013)


Version 1.3.0 (July 27, 2013)

* Added Ptex support for Vray material
* Added insert Gamma Nodes option for Linear Workflows (mia_mat and Vray Mtl)
* Bug fix- Some Vray textures failed to assign to file nodes in previous version of TR
* Bug fix- The 'create shading network' button lit up green and "textures found" message displayed only if a diffuse file texture was found
* Bug fix- Misnamed icon filename

Version 1.2.1 (June 23, 2013)

* Bug Fix- # UnboundLocalError: local variable 'file_node4' referenced before assignment #

Version 1.2.0 (June 22, 2013)

* Added Store Config and Toggle Hypershade Buttons (top left)
* Added support for Ptex (mia_material_X and Blinn).
* For Ptex in MR, maya.rayrc file created in maya/prefs folder if it doesn't already exist (rendering will require Maya restart)
* UI Improvements - nicer button graphic, found textures highlit in green, info display window, new shelf icon
* Bug fix- Specular Gloss overwrote Emissive texture slot
* Bug fix- When creating a Blinn shader, script tries to delete node before it exists
* Bug fix- Script editor gives error @ Create Network if hypershade isn't open

Version 1.1.0    (June 10, 2013)

* Added support for Vray and Arnold renderers with Vray_Mtl and aiStandard material shaders
* Added support for Maya Blinn (useful for viewport 2.0 texture map previews)
* Added option for creating Place2D Texture nodes before file texture nodes
* Added transparency, cutout opacity and emissive (self illumination) texture slots
* Added 'tooltip' annotations to many UI elements
* Added support for vector displacement with 'vector space options' menu
* Set attribute 'Alpha is Luminance' to On for all file textures (when might someone specifically not want that? Email me!)

Version 1.0.1    (May 25th 2013)

* Fixed bug on Mental Ray plugin load
* Redirected Texture Robot 'Home' icon button to this page

Version 1.0.0    (May 2013)

* Initial Release version  


Noted Bugs / Rough Edges

* Once in a while I've noticed the Object list stops showing objects. This is fixed by closing Texture Robot, and reopening it. I'm not sure why this happens but I'm working on a proper fix.

* If TR finds both a bump map file and a normal map file, it will try to hook both of them up to the network, which will result in an error. Same goes for displacement and vector displacement. A workaround for this problem while working in Maya is to temporarily change the suffix of one of the slots (the one you don't want to use) to something unrecognisable (ie, change bump from 'b' to 'x', then refresh the texture slots. A proper fix will be to code in some radio buttons which toggle between bump and normal map or displacement and vector displacement.


Features or possibilities planned for future versions

* Update currently selected shader via filename versioning, ie- of the two files 'apple_d_v01.jpg' and 'apple_d_v02.jpg', the latter file will be selected and will overwrite the current entry in the file texture node, or create a new node if none existed.

* Shader conversion (from mia_material_x to VrayMtl for eg) (? a bolt on feature, low priority)

* Udim (multi UV patch) support

* 'Super auto' feature - if a scene object(s) matches a name in Texture Robot's object list, the script will automatically apply the associated textures to the selected (unselected?) geometry. This could be an 'outside the UI' feature, possibly another shelf icon or hotkey, leaving the UI as a general configuration tool.

* SSS layer slots for combined SSS and mia_mat etc,

* Dx11 shader support

* UI improvements


INSTRUCTIONS:

Video coming Soon


Sunday, May 26, 2013

Introducing Texture Robot - Auto File Texture Assigner for Maya


Humbly but proudly presenting 'Texture Robot'


Today I'm pleased to announce a new tool for Maya. 'Texture Robot' represents my first foray into building Maya tools with Python and I'm surprised it works at all, but it does. This little robo does the job of automatically assigning common file textures (maps) into shading networks based on simple filename conventions.

Since a video is worth a thousand pictures (at 25 fps running for 40 seconds anyway) below's a quick preview demonstration of the new script in action. Over the next week or so I'll try to find the time to create a new post here on the blog which will serve as 'Home' for Texture Robot- it'll include some proper instructions, a program changelog and updates on any planned or new features, of which I have a few in mind already.

So without further ado, take it away- Texture Robot...


Edit : the script is now online at Creative Crash.

Friday, February 1, 2013

Assign MIA or VRay Materials to Objects with a Click (Or Two)

POST UPDATED 3/3/2013


Generating a custom shelf with all of your favourite Maya scripts and tools in it can help save a lot of time


Something I've thought for a while would be nice is just a little shortcut that would create a mia_material and assign it to the currently selected object automatically, without needing to go into the hypershade and hunt through shaders, or use the right click menus. The other day I noticed that if you have VRay installed, on the VRay shelf tab (it takes over the previous 'Rendering' tab) there's a shortcut item there for applying a VRay standard material to your object. If you right click on the icon and select 'edit' (taking you into the Shelf Editor) you'll see the code is pretty simple...

createAndAssignShader VRayMtl ""

From there, I was happy to discover that if you swap out 'VRayMtl' for 'mia_material_x', it creates a mia_x instead. Logical I guess... but still pretty cool.

So now I have a new icon in my main custom shelf tab- whereby a single click creates and applies a standard Vray material, and double clicking applies a mia_material instead. I've also taken advantage of the 'Popup Menu Items' feature of the Shelf Editor (accessible via the far right tab) to include a few more select materials which I use constantly.

Adding additional menu items to a shelf icon shortcut with the Shelf Editor

This is a a simple case of copy pasting the previous code into new menu items and replacing 'VrayMtl' or 'mia_material_x' with the relevant new material. Once you have your additional menu items, right clicking on the shelf icon will bring them up.

Quick access to frequently used materials


Of course, this shortcut is only one step reduced from using the actual right click menu, selecting 'Assign Favourite Material', and then selecting your material. But the point is it's still faster, and right clicking on a shelf icon brings up the menus instantly, whereas the right click menu takes a second to appear, which can be a little frustrating. Anyway, I like it. It makes me a happy Maya user.


PS, for more material related shortcut goodyness, I also really like this one from Dave Girard -author of '101 Autodesk Maya Tips'...

Basically it's just a fast way to get to an object's material attributes. This is like my favourite shortcut in Maya now. I have it mapped to 'Alt-A' (mapping it to CTRL-A apparently messed up a bunch of my other shortcuts or something).


PSS, Apologies to anyone who has written to me asking a question and I've failed to reply. I'm not trying to ignore you, I'm just a new dad with a busy work schedule and there's just very little time between work and fatherhood for chasing things up. I'm just tired. Sorry about that. :(

Saturday, June 9, 2012

Radial Anisotropy w/ mia_material

Anisotropic Brushed Metal Material


Here's how to create a cool, radially anisotropic metal type shader with the mia_material in Mental Ray/Maya.


(PS, For a  general introduction to anisotropic materials in CG, I recommend this great article by Neil Blevins at his CG Education website).


Jumping straight in- first, let's create a simple object in which to apply our shader to. For convenience sake- let's just use a poly disk, which you can find (yes, Maya has a poly disk!) by holding shift and right clicking in the viewport, then selecting 'Poly Disk'. Then create a new mia_material (or mia_material x) in the hypershade and apply it to the new object.

We're not going to worry about any of the other parameters apart from anisotropy for now; just scroll down through the mia_material until you reach the Anisotropy tab and click on it to extend it's parameters.

In the Anisotropy section of the mia_material there are three main parameters to consider. An 'anisotropy' parameter set to the default of 1 actually produces no anisotropic specularity, instead we get a normal, run of the mill isotropic (same in all directions) or rounded highlight. By moving the slider past or below one, we are able to stretch the highlight out. I find that turning the slider all the way down to .1 works fine. You'll notice that as soon as you adjust the Anisotropy parameter, the other two parameters- Rotation and Channel, become unlocked.

Next, we will need a texture in order to define the direction of our anisotropy. Click on the checker icon to the right of the Rotation parameter and select Ramp. In the ramp node, alter the Type to 'Radial Ramp', and make a two colour gradient that runs from black at the top to white on the bottom. Your sample swatch should look just like the one below. It's important to not get the colours reversed as that will not produce the desired result.

Make sure your ramp is set up correctly


At this stage you may want to do a quick test render. Turning on Mental Ray's IPR renderer can be useful when searching for a decent angle which will pick up the highlight. Rotate the camera around your object with IPR turned on and see how things are looking. Most probably you will observe a strange bending present in the highlight. This is where the 'Channel' parameter in the Anisotropy tab comes in. Default is -1. Set the channel to -2 and you should be now getting nice, straight, fanning anisotropic highlights (alternatively you can rotate the uv's of the disk 90 degrees).

Channel set to -1 on left, -2 on right


As far creating basic radial anisotropy with the mia_material, that's pretty much it.

For a more metallic look, try dialing down the diffuse colour/weight in the shader and give your material something to reflect... ideally some nice image based lighting. It's also a good idea to break up the highlight a little by putting something like a constrasted circular brushed metal texture into the colour slot of the reflection tab. Play around with the glossiness and glossy samples also.

You now have the unbridled power to create the bottoms of pots and pans and stereo knobs. :)

Click to Enlarge


Final example shader (in motion)


Thursday, May 31, 2012

Procedural Dents 'n' Dirt / Downward Drips (Part 3)

AO based weathering featuring DDD (Dents, Dirt, Drips)


Lately I've been working on trying to get some directionality into an AO weathering type shader. A problem with my previous shader was that the streaks weren't just dripping down from surfaces, but also dripping up. The current solution is to pipe the Out Colour of a Maya snow texture into both the bright and dark inputs of an AO node. Adjusting the 'depth decay' of the snow as well as the 'threshold' seem to be the main tweakable parameters here, along with AO spread.


I'm attaching an .ma scene file + shader if anyone would like to experiment (12 mb)
http://www.filedropper.com/ddddshader


Just the DDD shader
http://www.creativecrash.com/maya/downloads/shaders/c/ddd-shader-dents-dirt-drips

Monday, April 2, 2012

Maya 2013 - New Node Editor

A new look for Maya's next gen Node Editor

Originally introduced as part of the Maya 2012 SAP (Subscription Advantage Pack), it appears that a new Softimage style node editor will be included with the upcoming release of Maya 2013, replacing the Hypershade/Hypergraph/Dependency Graph of previous versions. On first impression, I have to say I like the look of this new editor. Being able to quickly expand a node to get a better visual sense of input and output connections seems very useful. With this one new feature, the old secondary Connection Editor becomes redundant and everything is nicely unified within a single editor. Pretty nice.

Another welcome addition which will save time is the new TAB field - allowing for a more convenient way to quickly search for and generate nodes, ala Nuke.

Press TAB to quickly search/create nodes


Check out the video below for a quick demo of the new Node Editor in action...


Thursday, March 15, 2012

jjj_gammaTools 2.0.1

Gamma Correcting for every texture or colour swatch in a large shader network can be a chore

I've recently begun the search in earnest for useful maya scripts that can help cut down on repetitive tasks. One such gem I've stumbled across is a very helpful 'gammaCorrect' node generating utility, which becomes extremely useful when working within a linear workflow in Maya. This tool automates the process of inserting gammaCorrect nodes wherever required in a shader network- specifically on colour swatches and 8 bit textures, in order to remove the encoded gamma of 2.2 and allowing them to render correctly in linear space.

(If you're unfamiliar with linear workflow, I'd highly recommend becoming aquainted with the subject. It's super important...)*


Here is the MEL script...

(requires registration with the Creative Crash site)


Wednesday, March 7, 2012

Light Based Ambient Occlusion

Ambient occlusion based on luminance 


Here's a quick shader which will improve the look of your ambient occlusion pass by integrating it more closely with the directional lighting in your scene.

Sunday, February 26, 2012

Fake Parallax

Offsetting texture UVs via the camera normal


A good example of this shader is to imagine a building with a window cut into it, allowing the viewer to see through into the room beyond. Instead of modeling out the interior (which can be prohibitive in computer game environments where this trick is often applied) we can use a texture of the room instead, aligned roughly to the outside wall, with an offset to give the viewer a parallax cue in order to make it appear as though the room has some sort of three dimensional depth.

This is easier to understand when we can see things in motion - here's a quick setup scene to help illustrate.


Obviously this technique has some limitations, but when used in mid to background elements in shots where the camera motion isn't too extreme, it may be just the thing needed to help add some quick depth to a 3D scene, cutting down on the time spent modeling, texturing and lighting an interior.

So let's look at how we can go about setting up a shader which can recreate this parallax effect in Maya...

Monday, August 8, 2011

Procedural Dents 'n' Dirt (Part 2)

The terms 'Ambient Occlusion map' (or 'AO map') and 'Dirt map' are often used interchangeably. Vray has a node called 'Vray Dirt', which is actually just an ambient occlusion node. Recently I saw an advert for a 3ds Max plugin that allows users to weather and dirty up their models with a fairly realistic looking procedural grime, complete with nice looking streaks. Ambient occlusion does a pretty good job of simulating the areas where dirt buildup is likely to occur on an object.


A very dirty keyboard

Today we'll go a little bit further in Maya than simply baking out an AO map; we'll use ambient occlusion as the beginnings of a mask for a procedural dirt texture. Then, as an enhancement we'll add some streaks in order to break things up a bit for a more natural look. Once finished, we will have created something that does a similar job to the commercial 3ds Max plugin described above, and we'll have saved $30! In Part 3 we will conclude this tutorial by connecting the 'dirt' shader network to our 'dents' shader network (see Part 1), for a very flexible overall shader that we can use in a variety of projects.

Friday, August 5, 2011

Procedural Dents 'n' Dirt (Part 1)

edit: This post has been updated as of 6/13/2012, to account for a previous missed step in the shading network (insert clamp node).  
Example shader

This is a really great technique for quickly generating some chips and dents along the outside edges of your model, as well as adding a layer of dirt (in part 2) to the more recessed areas. Once you have a handle on this technique you can then customise and apply it to all manner of materials. For this shader we will be utilising two of the Mental Ray nodes- a 'mib_amb_occlusion' node as well as a 'mia_roundcorners' node.

Firstly, let's work on generating some chips and dents for our model...


To get a better sense of what we're aiming for, here are some images which show the effect of edge chipping...

Examples of images of edge chipping on a variety of materials


Alright. Some nice subtle and not so subtle edge chipping. By looking at these shots we can appreciate that many objects in the real world show signs of this kind of wear and tear. What this means when it comes to our models and textures is that often times it is not enough to just simply apply a bevel to our object- but we should also think about introducing some variation into the bevel itself for added realism. We want to break up the bevel. How much will depend on our object, it's age and the material we are trying to represent.


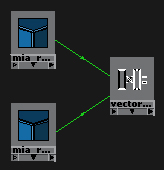
So let's start... In the hypershade, bring two new 'mia_roundcorners' nodes into the work area. We also need to bring in an additional node- one of the Maya utility nodes- called 'Vector Product'.

Double click on the Vector Product node to bring up it's attributes window. Then, with mouse pointer over one of the roundcorners nodes in the hypershade, middle click and drag over to the 'input 1' slot in the Vector Product attributes. Release the middle button and the two nodes should now be connected. Do the same for the other roundcorners node but this time connect it to the 'input 2' of the vector product.

Two roundcorners_bump nodes connected to input 1 and input 2 of a Vector Product node

So far, so good.


Thursday, August 4, 2011

Welcome :)

Welcome to Materialism, a blog primarily about shading networks and materials. Hopefully over time this site will start to serve as a repository of neat shader tricks and information that people may be able to find useful in their own projects. The focus will be on Mental Ray for Maya in the beginning, with a possible expansion into other rendering engines and 3d packages as time goes on. Whenever I can personally learn something new and interesting which I feel has not been posted ad infinitum elsewhere on the web- I'll aim to make a post on it.

I'll likely be experimenting with basic design and functionality of the site over the next few weeks.

Hope you enjoy :)