Sunday, May 26, 2013

Introducing Texture Robot - Auto File Texture Assigner for Maya


Humbly but proudly presenting 'Texture Robot'


Today I'm pleased to announce a new tool for Maya. 'Texture Robot' represents my first foray into building Maya tools with Python and I'm surprised it works at all, but it does. This little robo does the job of automatically assigning common file textures (maps) into shading networks based on simple filename conventions.

Since a video is worth a thousand pictures (at 25 fps running for 40 seconds anyway) below's a quick preview demonstration of the new script in action. Over the next week or so I'll try to find the time to create a new post here on the blog which will serve as 'Home' for Texture Robot- it'll include some proper instructions, a program changelog and updates on any planned or new features, of which I have a few in mind already.

So without further ado, take it away- Texture Robot...


Edit : the script is now online at Creative Crash.

Friday, February 1, 2013

Assign MIA or VRay Materials to Objects with a Click (Or Two)

POST UPDATED 3/3/2013


Generating a custom shelf with all of your favourite Maya scripts and tools in it can help save a lot of time


Something I've thought for a while would be nice is just a little shortcut that would create a mia_material and assign it to the currently selected object automatically, without needing to go into the hypershade and hunt through shaders, or use the right click menus. The other day I noticed that if you have VRay installed, on the VRay shelf tab (it takes over the previous 'Rendering' tab) there's a shortcut item there for applying a VRay standard material to your object. If you right click on the icon and select 'edit' (taking you into the Shelf Editor) you'll see the code is pretty simple...

createAndAssignShader VRayMtl ""

From there, I was happy to discover that if you swap out 'VRayMtl' for 'mia_material_x', it creates a mia_x instead. Logical I guess... but still pretty cool.

So now I have a new icon in my main custom shelf tab- whereby a single click creates and applies a standard Vray material, and double clicking applies a mia_material instead. I've also taken advantage of the 'Popup Menu Items' feature of the Shelf Editor (accessible via the far right tab) to include a few more select materials which I use constantly.

Adding additional menu items to a shelf icon shortcut with the Shelf Editor

This is a a simple case of copy pasting the previous code into new menu items and replacing 'VrayMtl' or 'mia_material_x' with the relevant new material. Once you have your additional menu items, right clicking on the shelf icon will bring them up.

Quick access to frequently used materials


Of course, this shortcut is only one step reduced from using the actual right click menu, selecting 'Assign Favourite Material', and then selecting your material. But the point is it's still faster, and right clicking on a shelf icon brings up the menus instantly, whereas the right click menu takes a second to appear, which can be a little frustrating. Anyway, I like it. It makes me a happy Maya user.


PS, for more material related shortcut goodyness, I also really like this one from Dave Girard -author of '101 Autodesk Maya Tips'...

Basically it's just a fast way to get to an object's material attributes. This is like my favourite shortcut in Maya now. I have it mapped to 'Alt-A' (mapping it to CTRL-A apparently messed up a bunch of my other shortcuts or something).


PSS, Apologies to anyone who has written to me asking a question and I've failed to reply. I'm not trying to ignore you, I'm just a new dad with a busy work schedule and there's just very little time between work and fatherhood for chasing things up. I'm just tired. Sorry about that. :(

Saturday, June 9, 2012

Radial Anisotropy w/ mia_material

Anisotropic Brushed Metal Material


Here's how to create a cool, radially anisotropic metal type shader with the mia_material in Mental Ray/Maya.


(PS, For a  general introduction to anisotropic materials in CG, I recommend this great article by Neil Blevins at his CG Education website).


Jumping straight in- first, let's create a simple object in which to apply our shader to. For convenience sake- let's just use a poly disk, which you can find (yes, Maya has a poly disk!) by holding shift and right clicking in the viewport, then selecting 'Poly Disk'. Then create a new mia_material (or mia_material x) in the hypershade and apply it to the new object.

We're not going to worry about any of the other parameters apart from anisotropy for now; just scroll down through the mia_material until you reach the Anisotropy tab and click on it to extend it's parameters.

In the Anisotropy section of the mia_material there are three main parameters to consider. An 'anisotropy' parameter set to the default of 1 actually produces no anisotropic specularity, instead we get a normal, run of the mill isotropic (same in all directions) or rounded highlight. By moving the slider past or below one, we are able to stretch the highlight out. I find that turning the slider all the way down to .1 works fine. You'll notice that as soon as you adjust the Anisotropy parameter, the other two parameters- Rotation and Channel, become unlocked.

Next, we will need a texture in order to define the direction of our anisotropy. Click on the checker icon to the right of the Rotation parameter and select Ramp. In the ramp node, alter the Type to 'Radial Ramp', and make a two colour gradient that runs from black at the top to white on the bottom. Your sample swatch should look just like the one below. It's important to not get the colours reversed as that will not produce the desired result.

Make sure your ramp is set up correctly


At this stage you may want to do a quick test render. Turning on Mental Ray's IPR renderer can be useful when searching for a decent angle which will pick up the highlight. Rotate the camera around your object with IPR turned on and see how things are looking. Most probably you will observe a strange bending present in the highlight. This is where the 'Channel' parameter in the Anisotropy tab comes in. Default is -1. Set the channel to -2 and you should be now getting nice, straight, fanning anisotropic highlights (alternatively you can rotate the uv's of the disk 90 degrees).

Channel set to -1 on left, -2 on right


As far creating basic radial anisotropy with the mia_material, that's pretty much it.

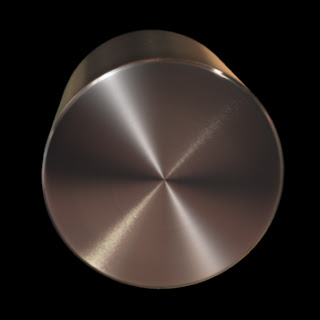
For a more metallic look, try dialing down the diffuse colour/weight in the shader and give your material something to reflect... ideally some nice image based lighting. It's also a good idea to break up the highlight a little by putting something like a constrasted circular brushed metal texture into the colour slot of the reflection tab. Play around with the glossiness and glossy samples also.

You now have the unbridled power to create the bottoms of pots and pans and stereo knobs. :)

Click to Enlarge


Final example shader (in motion)


Thursday, May 31, 2012

Procedural Dents 'n' Dirt / Downward Drips (Part 3)

AO based weathering featuring DDD (Dents, Dirt, Drips)


Lately I've been working on trying to get some directionality into an AO weathering type shader. A problem with my previous shader was that the streaks weren't just dripping down from surfaces, but also dripping up. The current solution is to pipe the Out Colour of a Maya snow texture into both the bright and dark inputs of an AO node. Adjusting the 'depth decay' of the snow as well as the 'threshold' seem to be the main tweakable parameters here, along with AO spread.


I'm attaching an .ma scene file + shader if anyone would like to experiment (12 mb)
http://www.filedropper.com/ddddshader


Just the DDD shader
http://www.creativecrash.com/maya/downloads/shaders/c/ddd-shader-dents-dirt-drips

Monday, April 2, 2012

Maya 2013 - New Node Editor

A new look for Maya's next gen Node Editor

Originally introduced as part of the Maya 2012 SAP (Subscription Advantage Pack), it appears that a new Softimage style node editor will be included with the upcoming release of Maya 2013, replacing the Hypershade/Hypergraph/Dependency Graph of previous versions. On first impression, I have to say I like the look of this new editor. Being able to quickly expand a node to get a better visual sense of input and output connections seems very useful. With this one new feature, the old secondary Connection Editor becomes redundant and everything is nicely unified within a single editor. Pretty nice.

Another welcome addition which will save time is the new TAB field - allowing for a more convenient way to quickly search for and generate nodes, ala Nuke.

Press TAB to quickly search/create nodes


Check out the video below for a quick demo of the new Node Editor in action...


Thursday, March 15, 2012

jjj_gammaTools 2.0.1

Gamma Correcting for every texture or colour swatch in a large shader network can be a chore

I've recently begun the search in earnest for useful maya scripts that can help cut down on repetitive tasks. One such gem I've stumbled across is a very helpful 'gammaCorrect' node generating utility, which becomes extremely useful when working within a linear workflow in Maya. This tool automates the process of inserting gammaCorrect nodes wherever required in a shader network- specifically on colour swatches and 8 bit textures, in order to remove the encoded gamma of 2.2 and allowing them to render correctly in linear space.

(If you're unfamiliar with linear workflow, I'd highly recommend becoming aquainted with the subject. It's super important...)*


Here is the MEL script...

(requires registration with the Creative Crash site)


Wednesday, March 7, 2012

Light Based Ambient Occlusion

Ambient occlusion based on luminance 


Here's a quick shader which will improve the look of your ambient occlusion pass by integrating it more closely with the directional lighting in your scene.