POST UPDATED 31/12/2013 - INCLUDES SETTINGS FOR MENTAL RAY MIA_MATERIAL
Some time ago I figured out it's possible to make a serviceable 'thickness' or 'gummi' type compositing/utility shader in Vray using the Vray Mtl and it's 'Fog' parameter. At my current workplace we've used in the past a 3rd party shader from Binary Alchemy (the RayLength shader I believe), in order to compliment subsurface scattering at the compositing stage via a thickness pass. This was explained to me by my boss at the time as a dirty trick, which nevertheless had the desired effect of making our CG food look more 'foodlike' and appetising. It's a strange but potentially useful technique, which I'll cover in a later post. For now let's just focus on making the shader. The basic idea is also translatable to a MR mia_material version, using the 'Max Distance' instead of the Vray 'Fog' parameters.
Basically, a thickness shader is one which is able to approximate the interior thickness of an object. A thickness pass would describe in greyscale values the relative thickness of something, ie- whiter pixels representing thicker areas and darker pixels thinner areas. As you can see in the video above, the dragon's tail, tip of the tongue, horns etc, are all darker in colour while the belly, legs and head are the thickest, lightest areas. When setting up the shader, we will need to invert these values however, and then re-invert back in our compositing package later on.
Setting up the shader/pass...
Create a new domelight, check the 'spherical' box, and leave the rest of the options at default. This provides a nice, over all lighting for the scene on a white background. Apply a new Vray Mtl material to your object. Now let's dial in some settings-
Diffuse Color - (0 -black) We don't want any diffuse.
Reflection Color - (0 -black) We don't want any reflection.
Refraction Color - (1 -white) The object should be completely refractive/transparent.
Refraction Glossiness - (.5 or lower). This smooths out the interior refractions, making them very glossy and giving the object a gummy, or jellylike look. It's important to blur out any interior details so I'd probably advise .5 as a starting point and then push the blurriness as far as you are willing to go. Don't forget to increase the refraction subdivs up to get rid of the increased noise.
Refraction IOR - (1) We don't want any light bending as it passes through the object. Setting the IOR to 1 ensures the light travels through the object in a straight line.
Fog Color - (.05 -very dark grey). This parameter is the reason for rendering the pass inverted (dark object on white background). I don't think it's possible to do it the other way around (light object on black bg).
Fog Multiplier - This value will change depending on your object scale and thickness, and should decrease as the scale of the object increases. For an object roughly the length of 20 maya units, a rough starting point might be a value of around .2. If you halve the scale of your object, try upping the Multiplier to .4. Basically, you want a good range between the lights and darks, but not too contrasted. Fog bias should be left at default.
We're not interested in bump, anisotropy or sss settings- leave those at default.
The settings for a mia_material version are very similar to the Vray one...
Color - (0 - Black)
Reflectivity - (0)
Index of Refraction - (1)
Transparency (under refraction tab) - (1)
Glossiness - (.3) (reduce noise by increasing glossy samples)
Under Advanced Refraction tab-
Check 'Use Max Distance'
Max Distance (6? - Adjust to preference, using reference image above as guide)
Check 'Use color at Max Distance'
Color at Max Distance (very dark grey)
In Part 2 we'll head over to Nuke and talk a bit about how we might use a thickness pass to enhance the look of SSS materials. See you then :)
Thickness pass (values inverted from render) - Mental Ray
Some time ago I figured out it's possible to make a serviceable 'thickness' or 'gummi' type compositing/utility shader in Vray using the Vray Mtl and it's 'Fog' parameter. At my current workplace we've used in the past a 3rd party shader from Binary Alchemy (the RayLength shader I believe), in order to compliment subsurface scattering at the compositing stage via a thickness pass. This was explained to me by my boss at the time as a dirty trick, which nevertheless had the desired effect of making our CG food look more 'foodlike' and appetising. It's a strange but potentially useful technique, which I'll cover in a later post. For now let's just focus on making the shader. The basic idea is also translatable to a MR mia_material version, using the 'Max Distance' instead of the Vray 'Fog' parameters.
Basically, a thickness shader is one which is able to approximate the interior thickness of an object. A thickness pass would describe in greyscale values the relative thickness of something, ie- whiter pixels representing thicker areas and darker pixels thinner areas. As you can see in the video above, the dragon's tail, tip of the tongue, horns etc, are all darker in colour while the belly, legs and head are the thickest, lightest areas. When setting up the shader, we will need to invert these values however, and then re-invert back in our compositing package later on.
Setting up the shader/pass...
In Vray -
Create a new domelight, check the 'spherical' box, and leave the rest of the options at default. This provides a nice, over all lighting for the scene on a white background. Apply a new Vray Mtl material to your object. Now let's dial in some settings-
Diffuse Color - (0 -black) We don't want any diffuse.
Reflection Color - (0 -black) We don't want any reflection.
Refraction Color - (1 -white) The object should be completely refractive/transparent.
Refraction Glossiness - (.5 or lower). This smooths out the interior refractions, making them very glossy and giving the object a gummy, or jellylike look. It's important to blur out any interior details so I'd probably advise .5 as a starting point and then push the blurriness as far as you are willing to go. Don't forget to increase the refraction subdivs up to get rid of the increased noise.
Refraction IOR - (1) We don't want any light bending as it passes through the object. Setting the IOR to 1 ensures the light travels through the object in a straight line.
Fog Color - (.05 -very dark grey). This parameter is the reason for rendering the pass inverted (dark object on white background). I don't think it's possible to do it the other way around (light object on black bg).
Fog Multiplier - This value will change depending on your object scale and thickness, and should decrease as the scale of the object increases. For an object roughly the length of 20 maya units, a rough starting point might be a value of around .2. If you halve the scale of your object, try upping the Multiplier to .4. Basically, you want a good range between the lights and darks, but not too contrasted. Fog bias should be left at default.
We're not interested in bump, anisotropy or sss settings- leave those at default.
 |
| Basic Vray Mtl settings for a thickness shader |
 |
| Reference/Result |
In Mental Ray -
Color - (0 - Black)
Reflectivity - (0)
Index of Refraction - (1)
Transparency (under refraction tab) - (1)
Glossiness - (.3) (reduce noise by increasing glossy samples)
Under Advanced Refraction tab-
Check 'Use Max Distance'
Max Distance (6? - Adjust to preference, using reference image above as guide)
Check 'Use color at Max Distance'
Color at Max Distance (very dark grey)
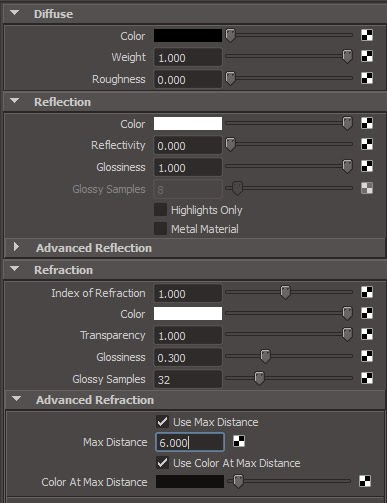 |
| settings for mia_material |
In Part 2 we'll head over to Nuke and talk a bit about how we might use a thickness pass to enhance the look of SSS materials. See you then :)
What about the second part? :D
ReplyDeletePART 2 PLEASE!!!!!!!!!!!
ReplyDeleteWas never able to get the Mental Ray version to work. As soon as I check the box for 'Use Max Distance' it goes black. Tried every distance from 0 to how far it was from the camera. ?
ReplyDelete